Tuesday, May 26th, 2026
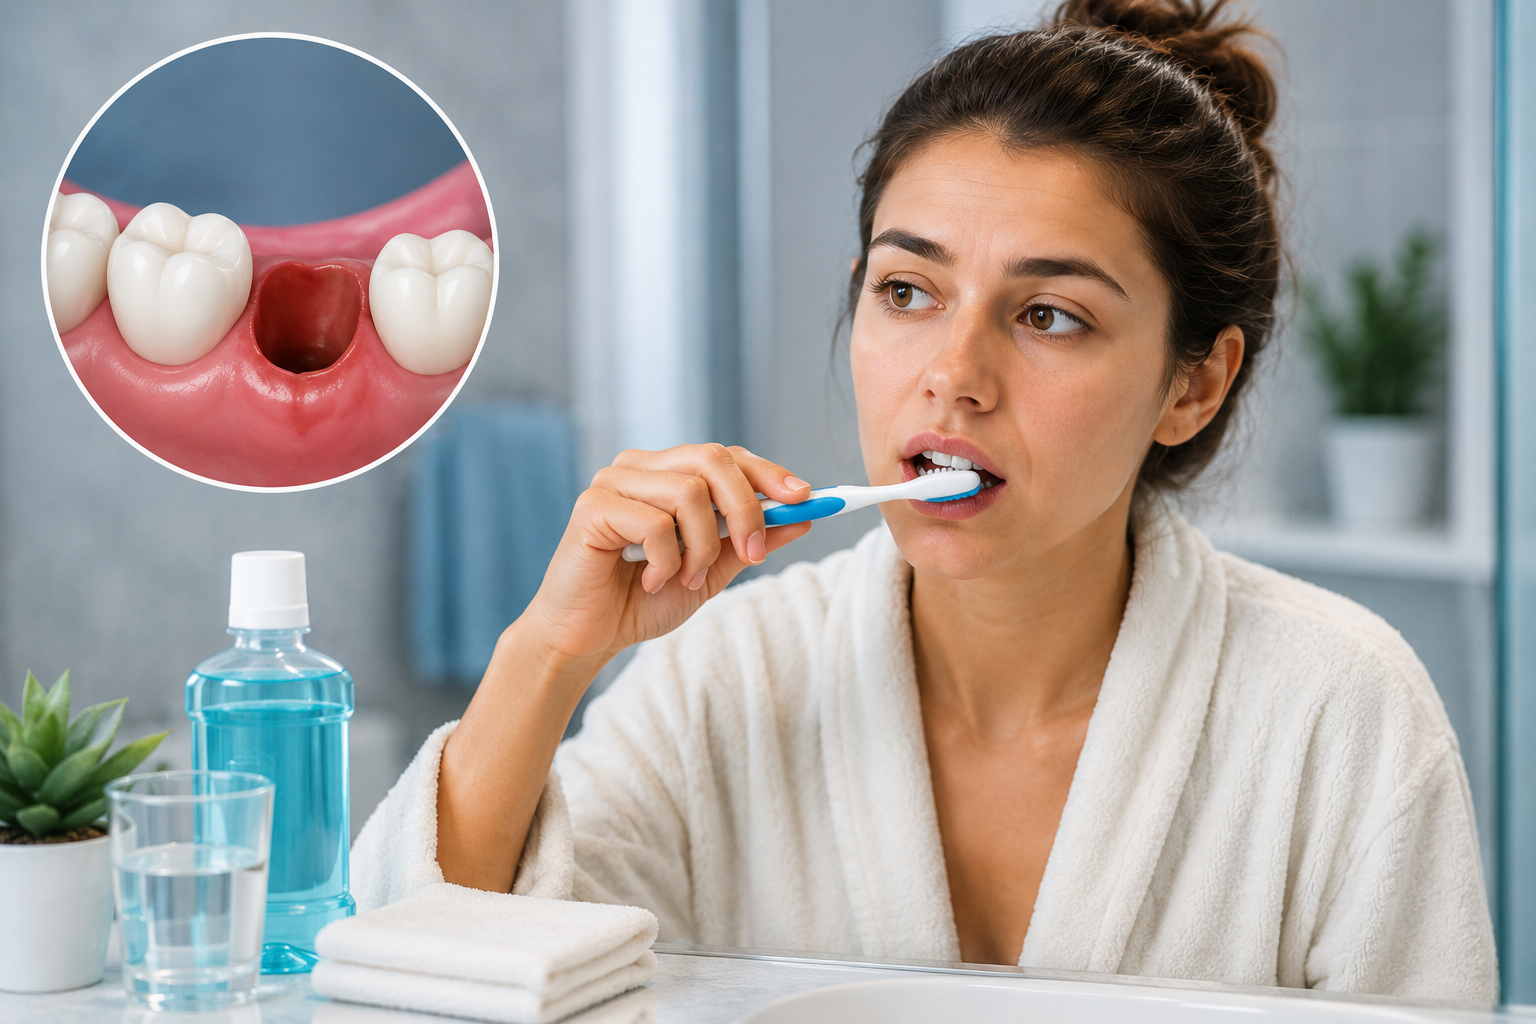
Getting your wisdom teeth removed is a major dental procedure, and while most people prepare for the swelling and soft-food diet, many are unsure about one important part of recovery: brushing their teeth safely afterward.
Although it may seem simple, brushing too aggressively after wisdom tooth extraction can irritate the healing area, disturb the blood clot, and slow down recovery. At the same time, keeping your mouth clean is essential to preventing infection and supporting proper healing.
Knowing when and how to brush after wisdom tooth removal can make recovery smoother, more comfortable, and far less stressful.
After wisdom tooth removal, it may feel safer to avoid brushing altogether, especially when your mouth feels sore and sensitive. However, keeping your mouth clean is an important part of the healing process. Bacteria and plaque can build up quickly after surgery, increasing the risk of infection and other complications if proper oral hygiene is neglected.
The key is not to stop brushing, but to brush carefully. Using the right technique, being gentle around the extraction area, and following your dentist’s instructions can help protect the healing site while keeping your mouth clean and healthy.
For the first 24 hours after your procedure, do not brush your teeth at all — not even gently. This window is critical because a blood clot is forming inside your empty socket. This clot is your body’s natural bandage; it protects the exposed bone and nerves beneath and is the foundation of all healing that follows.
During this first day:
If you feel desperate to freshen your mouth, you can gently dab the non-surgical areas with a moist cloth or take small sips of water. But keep everything as still as possible.
Starting from the second day, you can begin very carefully brushing the teeth that are away from the extraction site. Think of your mouth as having two zones: the healing zone (near the sockets) and the safe zone (everywhere else).
Here’s how to brush during days 2 and 3:
Also read: How Often Should You Get Your Teeth Cleaned?
About 24 hours after surgery, and more consistently from day 3 onward, warm salt water rinses can help keep the extraction area clean and support healing without irritating the sensitive tissue.
How to do a saltwater rinse correctly:
This gentle rinse flushes food debris and bacteria from around the wound without applying the kind of pressure that can disturb the clot or stitches.
At this stage, you can also begin very carefully and lightly brushing closer to the extraction site — not directly on it, but approaching it gradually as comfort allows.
By the end of the first week and into the second, most patients find that the extraction site is significantly less sensitive and that stitches (if dissolvable) are beginning to break down on their own.
You can now:
By week three to four, most patients are back to their normal brushing routine, though full bone healing of the socket takes several months.
A few practical additions can make post-extraction oral care significantly easier:
Soft-bristled or ultra-soft toothbrush: Non-negotiable during the first two weeks. Electric toothbrushes should be avoided in the early days — the vibration and pressure can be too intense near a healing wound.
Chlorhexidine mouthwash (if prescribed): Some dentists prescribe an antibacterial mouthwash like chlorhexidine for use after the first 24 hours. Use it exactly as directed — it’s highly effective at reducing bacteria but can stain teeth with prolonged use.
Oral irrigator or water flosser (after week 2): Once healing is well underway, a water flosser on its lowest pressure setting can help flush debris from the socket. Confirm with your dentist before using one.
Interdental brushes: Small and precise, these can be useful for cleaning between teeth near (but not inside) the healing socket.
Also read: Root Canal Before and After: What to Expect
Even well-intentioned patients sometimes make mistakes during recovery. Watch out for these:
If gentle brushing causes ongoing bleeding, severe pain, or a bad taste or smell from the extraction area, contact your dentist right away. These symptoms could be signs of infection or dry socket.
If you have concerns during healing, the team at Brookmere Dental Group is always here to support you with trusted, compassionate dental care. Contact us today for trusted guidance and compassionate dental care.
Q1. When can I start brushing my teeth after a wisdom tooth extraction?
We recommend avoiding all brushing for the first 24 hours after your extraction. After that, you can begin gently brushing the teeth away from the surgical site. Our team will give you specific instructions based on your procedure before you leave our office.
Q2. Can I brush the extraction site directly?
Not right away. For the first 3–4 days, avoid brushing directly over the socket. After that, our team suggests using the very tips of a soft-bristled brush in a light, circular motion — no scrubbing. Patience during this stage protects your clot and speeds up healing.
Q3. What type of toothbrush should I use after an extraction?
Always use a soft-bristle toothbrush during recovery. We advise against electric toothbrushes in the first week, as the vibration can be too strong near a healing wound. A compact or child-size brush can give you better control in a tender mouth.
Q4. Is it safe to use mouthwash after my procedure?
Avoid alcohol-based mouthwash for at least the first week — it can irritate healing tissue. If our team has prescribed a chlorhexidine rinse, use it exactly as directed. For most patients, warm saltwater rinses starting at the 24-hour mark are the safest and most effective option.
Q5. How do I do a saltwater rinse correctly?
Dissolve half a teaspoon of salt in a glass of warm water. Sip, hold for 30 seconds, then let the water drain gently from your mouth — do not spit with force. We recommend rinsing after meals and before bed. This simple step keeps the site clean without disturbing your healing clot.
Q6. What happens if I accidentally brush the extraction site too soon?
Don’t panic — one gentle graze is unlikely to cause serious harm. However, repeated or aggressive contact with the socket too early can dislodge the blood clot and lead to a dry socket. If you notice increased pain or bleeding after brushing, contact our team right away.
Q7. When can I go back to my normal brushing routine?
Most of our patients comfortably return to their regular brushing habits by the end of week two. We suggest easing back gradually — increasing pressure and coverage a little each day as the area becomes less sensitive. When in doubt, our team is always happy to advise.
Q8. Can I floss after wisdom tooth removal?
Yes, but carefully and only away from the extraction sites. Avoid flossing directly beside the socket until it has fully closed. We typically recommend waiting at least 1–2 weeks before reintroducing flossing near the surgical area.
Q9. Can I use a water flosser during recovery?
We suggest holding off on water flossers for the first two weeks. Once healing is well underway, a water flosser on the lowest pressure setting can be useful for flushing debris from the socket. Always check with our team before using one to make sure the timing is right for your recovery.
Q10. What signs should I watch for after brushing during recovery?
Contact our team at Brookmere Dental Group if you notice any of the following after brushing:
These symptoms may be signs of dry socket or infection, both of which are usually easy to treat when caught early. If something doesn’t feel right during your recovery, don’t hesitate to contact our office. We’re always here to help and support you.
Monday, May 25th, 2026
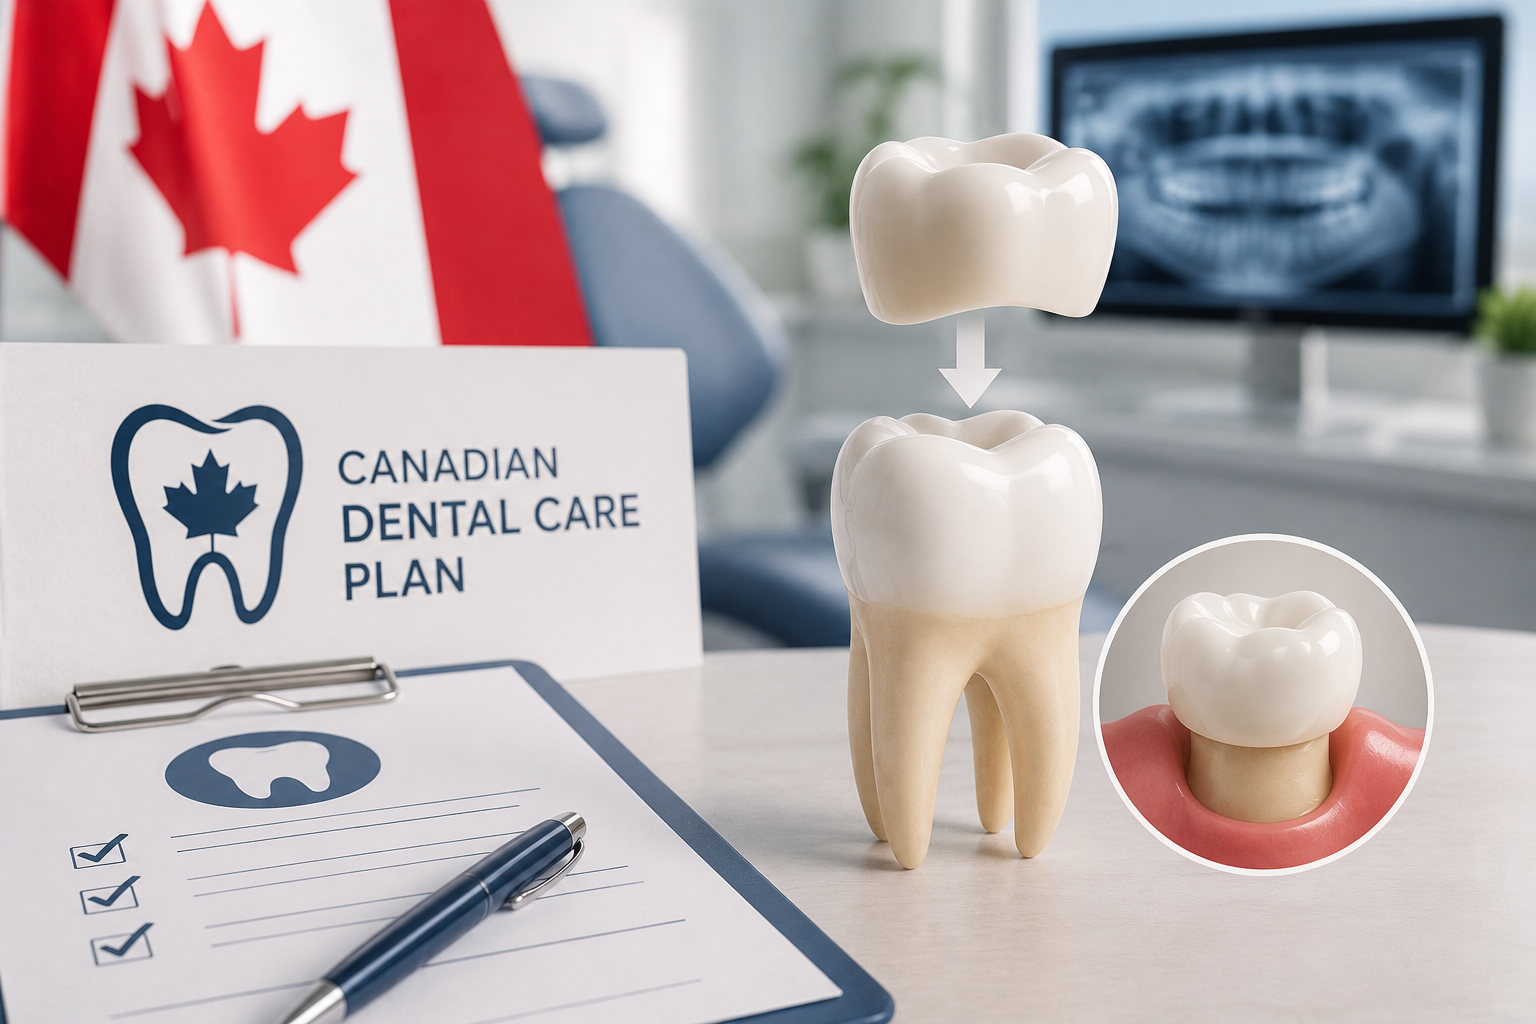
If your dentist has recommended a dental crown and you are enrolled in, or considering enrolling in, the Canadian Dental Care Plan, one of the first questions you may have is whether the treatment will be covered.
The short answer is yes, but coverage comes with certain conditions. Dental crowns may be covered under the CDCP when they are considered medically necessary and approved through the required preauthorization process. Coverage can also depend on factors such as frequency limits and household income.
Understanding how CDCP crown coverage works before beginning treatment can help you avoid unexpected costs and feel more confident about your dental care decisions.
The Canadian Dental Care Plan is a federal government program designed to make oral health care more accessible and affordable for Canadians who don’t have private dental insurance. Administered by Health Canada and managed day-to-day by Sun Life, the CDCP provides coverage for a broad range of dental services — from routine cleanings and X-rays to more complex restorative treatments like root canals, dentures, and crowns.
The plan is income-tested, meaning how much you pay out of pocket depends on your adjusted family net income. It is not a free dental program for everyone, but it can significantly reduce the cost of major dental work for eligible Canadians.
Yes, dental crowns are covered under the CDCP as a major restorative service, but coverage is not automatic or universal. The plan covers crowns only when they are considered medically necessary, not for cosmetic purposes.
Specifically, a crown is typically approved by the CDCP when:
Cosmetic dental crowns that are placed only to improve the appearance of a healthy tooth are generally not covered under the Canadian Dental Care Plan.
One of the most important things to understand about crown coverage under the CDCP is the preauthorization requirement. Unlike simpler procedures such as fillings or cleanings, crowns cannot be claimed retroactively — the approval must come before treatment begins.
Here’s how the preauthorization process works:
Skipping the preauthorization process can result in your dental crown not being covered under the CDCP, even if you are otherwise eligible for benefits. Before starting treatment, it is important to confirm with your dentist that preauthorization has been properly completed and approved.
The CDCP places specific limits on how often crown coverage can be accessed to prevent overuse. Current limits include:
In exceptional circumstances, exceptions to these frequency limits may be granted through preauthorization if there is a clinically justified reason.
Also read: Root Canal Before and After: What to Expect
Even with CDCP coverage, you may not have the full cost of your crown covered. How much you contribute depends on your adjusted family net income:
| Adjusted Family Net Income | CDCP Covers | You Pay |
|---|---|---|
| Under $70,000 | 100% of eligible fees | Nothing (co-payment) |
| $70,000 – $79,999 | 60% of the eligible fees | 40% co-payment |
| $80,000 – $89,999 | 40% of eligible fees | 60% co-payment |
It’s important to note that these percentages apply to the CDCP’s own established fee schedule, not necessarily to what your dentist actually charges. If your dentist’s fee for a crown is higher than the CDCP rate — which is often the case — you will be responsible for the difference on top of any co-payment. This is called balance billing, and it is permitted under the CDCP.
Before proceeding with a crown, ask your dental office for a clear breakdown of the CDCP-covered amount versus the total fee so you know exactly what to expect.
Understanding what the CDCP excludes is just as important as knowing what it includes. The following are not covered:
Annual Benefit Limit
Since January 1, 2025, the CDCP has increased the annual reimbursement limit to $3,000 per year per eligible person. This covers the combined total of all services used throughout the year, including preventive care, fillings, and any major procedures like crowns. If your total dental costs in a year exceed this amount, the remaining costs fall to you.
A few practical steps can help you avoid surprises and maximize your benefit:
The Canadian Dental Care Plan can help cover the cost of dental crowns when they are considered medically necessary and approved through the preauthorization process. Depending on your household income, eligible Canadians may receive significant coverage, making restorative dental care much more affordable.
Brookmere Dental Group proudly accepts CDCP coverage and is committed to helping eligible patients access quality dental care with confidence. If you have questions about dental crowns or your coverage options, our friendly team is here to help guide you through the process.
Does Brookmere Dental Group accept the Canadian Dental Care Plan for dental crowns?
Yes, at Brookmere Dental Group we proudly accept the Canadian Dental Care Plan (CDCP). Our team can help you understand your coverage, review your eligibility, and guide you through the process for dental crown treatment.
Can you help me with the CDCP preauthorization process for crowns?
Absolutely. Our team will assist you with the CDCP preauthorization process before your treatment begins. We work directly with Sun Life to submit the required documentation so you can better understand your expected coverage and out-of-pocket costs.
Will I have to pay anything for a dental crown under the CDCP?
Your costs depend on your adjusted family net income and the CDCP fee schedule. During your visit with us, we will provide a clear breakdown of what the CDCP may cover and any remaining balance you may be responsible for before treatment starts.
Does Brookmere Dental Group offer crowns after root canal treatment?
Yes, we often recommend dental crowns after root canal treatment to help protect and strengthen the tooth. If the crown is considered medically necessary, it may qualify for CDCP coverage once preauthorization is approved.
How do I know if my dental crown is medically necessary?
When you visit us, our dentist will carefully examine your tooth and determine whether a crown is the most appropriate treatment. Dental crowns are commonly recommended for severely damaged, weakened, or root canal-treated teeth.
Can I book a consultation with Brookmere Dental Group to discuss CDCP coverage?
Yes, you can contact Brookmere Dental Group to schedule a consultation. Our friendly team is happy to answer your questions about dental crowns, CDCP coverage, and available treatment options.
Tuesday, December 30th, 2025
Full-mouth dental implants are among the most effective ways to restore a complete smile, improve chewing function, and rebuild confidence—especially for people with severe tooth loss. But if you’re considering this treatment in Canada and don’t have dental insurance, cost is likely your biggest concern.
This guide explains everything you need to know about the cost of full-mouth dental implants without insurance, what factors affect pricing, the different types of full-mouth solutions available, and whether the investment is worth it in the long run. If you’re evaluating dental options and want clarity before making a decision, this breakdown will help you move forward with confidence.
Full mouth dental implants are designed for patients who have lost most or all of their teeth. Instead of replacing each tooth individually, dentists use multiple strategically placed implants to support a full arch of artificial teeth.
Two of the most common options include:
Both options offer strong, natural-looking results that outperform dentures in comfort, stability, and longevity.
Also read: Root Canal Before and After: What to Expect
The cost of full-mouth dental implants varies depending on the type of treatment, the materials used, and the clinical complexity. Since dental implants are not covered by provincial health plans and most private insurance plans only cover portions—not full cases—patients often pay a significant part out of pocket.
| Procedure | Estimated Cost (CAD) | Coverage Without Insurance |
|---|---|---|
| All-on-4 (one arch) | $20,000 – $30,000 | Out-of-pocket |
| All-on-4 (both arches) | $40,000 – $50,000 | Out-of-pocket |
| Traditional implants (one arch) | $30,000 – $45,000 | Out-of-pocket |
| Traditional implants (full mouth) | $50,000 – $70,000 | Out-of-pocket |
If you’re choosing full mouth implants without insurance, the final cost will depend on multiple factors—some controllable, some not. Understanding each component helps you plan your investment realistically.
All-on-4 tends to be more affordable because it uses fewer implants and often requires less bone grafting. Traditional full-mouth implants offer excellent long-term durability but cost more.
Some patients need preparatory treatments, such as:
These extra steps can add $500 to $3,000+ to your total.
The full arch of replacement teeth can vary in cost depending on the material:
Clinics offering:
May charge more, but they also deliver higher success rates and better long-term outcomes.
For many Canadians, full mouth implants are a major financial decision. But when comparing long-term value, they often outperform dentures or bridges.
Here’s why implants are considered worth the investment:
Implants can last 20–30 years or more with proper care. The prosthetic arch may need replacement after 10–15 years.
Unlike dentures, implants:
Implants stimulate the jawbone and prevent bone loss—something dentures cannot do.
Patients often report feeling more secure socially and professionally.
| Treatment Option | Initial Cost | Lifespan | Long-Term Value |
|---|---|---|---|
| Full Mouth Implants | $40,000–$70,000 | 20–30+ years | Excellent |
| Dentures | $1,500–$3,000 per set | 5–10 years | Low (frequent replacements) |
| Bridges | $2,000–$5,000 per tooth | 10–15 years | Moderate |
Over decades, dentures may end up costing as much as implants—without offering the same function or comfort.
Also read: How Much Is Teeth Cleaning Without Insurance?
Most insurance companies in Canada classify dental implants as major or cosmetic procedures. Because of this:
Since full mouth implant treatment is extensive, patients usually pay most of the cost themselves.
All-on-4 can be a more affordable alternative to traditional implants while still offering excellent stability.
Some patients replace one arch first and complete the second later.
In-house milling or digital dentistry can reduce prosthetic costs.
Here’s a simplified overview of the process:
Your dentist evaluates bone structure, gum health, and treatment options.
The dentist designs a custom plan based on function, aesthetics, and long-term goals.
Implants are inserted into the jawbone. In many All-on-4 cases, temporary teeth are placed the same day.
The implants fuse with bone over 3–6 months.
Permanent prosthetic teeth are attached once healing is complete. The result is a stable, natural-looking smile that lasts for years.
Full mouth dental implants are ideal if you:
Full mouth dental implants are a life-changing treatment, offering unmatched comfort, function, and aesthetics. While the cost can be significant—especially without insurance—many patients find the long-term value and improved quality of life well worth the investment.
If you’re considering full mouth dental implants and want personalized guidance, expert care, and transparent pricing, book your appointment at Brookmere Dental Group today. Our team will help you understand your options, review costs, and build a treatment plan tailored to your needs.
Wednesday, December 10th, 2025
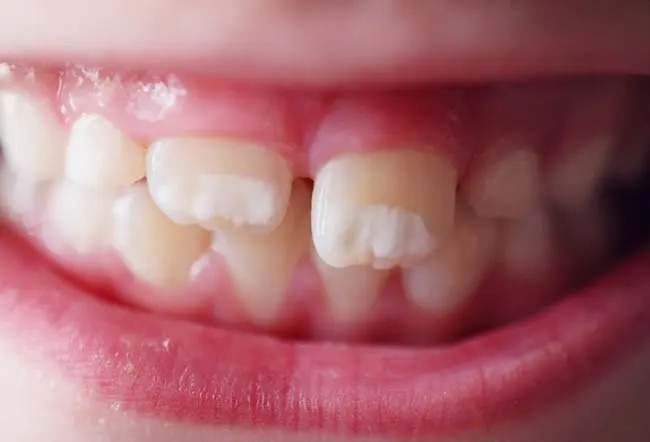
White spots on teeth are a common cosmetic concern among both adults and children. While they are not always harmful, these small patches can affect your confidence, especially when they appear on the front teeth. The good news is that many causes of white spots are treatable, and several dental treatments can significantly improve your smile.
If you have noticed chalky, bright, or uneven white marks on your teeth, this detailed guide explains what they mean, why they happen, and the best ways to treat and prevent them.
White spots appear as lighter, cloudy patches that differ from the natural shade of the tooth. They often indicate changes in the tooth enamel, either due to mineral loss, excess minerals, acid exposure, or early signs of decay. Understanding the reason behind these spots is the first step in choosing the right treatment.
Also read: How Often Should You Get Your Teeth Cleaned?
White spots can form for several reasons. Here are the most common causes seen in Canadian dental clinics:
1. Enamel Hypoplasia: Enamel hypoplasia is a condition where the enamel does not form properly. This can be caused by nutritional deficiencies, illness during early childhood, premature birth, or trauma to the developing teeth. These white spots often appear as chalky, rough areas on the teeth and may be more sensitive.
2. Fluorosis: Dental fluorosis occurs when children consume too much fluoride while their teeth are still forming. This often happens due to:
Mild fluorosis results in small white streaks or patches, while moderate cases may show more noticeable spots.
3. Demineralization (Early Tooth Decay): Demineralization happens when acids produced by harmful bacteria break down the enamel. This is common in people who:
If untreated, these spots can progress into cavities.
4. Nutritional Deficiencies: A lack of calcium, vitamin D, or essential minerals can weaken the enamel, leading to uneven white areas.
5. Dry Mouth (Xerostomia): Dry mouth decreases saliva production. Since saliva helps neutralize acids and remineralize teeth, reduced flow can lead to chalky white areas and enamel erosion.
Also read: Root Canal Before and After: What to Expect
6. Acidic Foods and Drinks: Frequent consumption of:
…can lead to enamel erosion, making white spots more noticeable.
7. Poor Oral Hygiene with Braces: Many people notice white spots after orthodontic treatment. When plaque builds up around brackets, enamel begins to decay in those areas, leaving behind permanent white marks.
Fortunately, modern dentistry offers several effective treatments for white spots. Your dentist will recommend the most suitable option based on the cause, severity, and condition of your teeth.
Fluoride helps strengthen enamel and promote remineralization. Dentists may recommend:
These treatments are effective for mild white spots caused by early demineralization.
Remineralization uses calcium and phosphate-based products to rebuild the enamel. Common options include:
These products are excellent for early enamel damage and mild fluorosis.
Microabrasion gently removes a very thin layer of enamel, reducing the appearance of white spots. This is an ideal treatment when the spots are shallow and affect the outermost layer of enamel.
Icon is a minimally invasive cosmetic treatment widely used in Canada. This technique involves applying a resin to the affected tooth, which penetrates the weakened enamel and blends the white spot with the natural tooth colour.
Icon is especially effective for:
It offers immediate cosmetic improvement without drilling or removing healthy enamel.
While whitening does not remove the white spots, it lightens the surrounding enamel so the colour blends more evenly. This is a good option if the spots are mild and evenly distributed.
However, deeper spots may become more noticeable temporarily after whitening, so professional guidance is recommended.
For more stubborn or deeper white spots, bonding may be recommended. The dentist applies a tooth-coloured resin that covers the spot and restores uniformity. Bonding is affordable and provides quick cosmetic improvement.
If the white spots are extensive or resistant to other treatments, veneers offer the most dramatic and long-lasting solution. Veneers cover the entire front surface of the tooth, completely hiding any imperfections.
This option is ideal for people seeking a flawless, bright smile.
Proper brushing removes plaque and protects enamel.
Cut down on:
If you consume them, rinse your mouth with water afterward.
Children should use only a pea-sized amount of toothpaste and avoid swallowing it. Adults should choose the right fluoride concentration based on dental advice.
Drink plenty of water throughout the day, especially if you experience dry mouth.
Include foods rich in:
Dairy, leafy greens, nuts, and fish support healthy enamel development.
Routine dental checkups help identify early enamel issues and prevent white spots from becoming more noticeable.
If you or your child wears braces:
This prevents plaque buildup around brackets.
You should visit your dentist if:
Early evaluation ensures proper diagnosis and treatment.
White spots on teeth may be common, but they do not have to affect your confidence. With the right treatment and preventive care, you can restore your smile and protect your enamel for years to come. Whether the spots are due to early decay, fluorosis, or orthodontic treatment, your dentist can recommend the best solution based on your needs.
If you’re concerned about white spots or want to explore effective cosmetic treatments, book your appointment at Brookmere Dental Group today. Our team is here to help you achieve a healthier, brighter, and more confident smile.
Thursday, November 13th, 2025
Dental care is an essential part of overall health, yet many Canadians delay or avoid visiting the dentist due to cost concerns. Fortunately, the Canadian Dental Care Plan is making oral healthcare more accessible for eligible individuals and families across the country including residents of Burnaby, BC.
If you’re wondering what a CDCP dentist in Burnaby can offer and how this program helps you access affordable dental care, this guide covers everything you need to know from eligibility to benefits and what to expect at your next dental visit.
The CDCP is a federal initiative launched to help uninsured Canadians access essential dental treatments. The goal is simple — to make oral health care more affordable and available to those who might otherwise skip necessary dental visits due to financial barriers.
Administered by Health Canada and Sun Life, the CDCP provides coverage for basic and preventive dental services such as exams, cleanings, fillings, and extractions. The plan is being rolled out in phases, starting with seniors, followed by children, adults with disabilities, and eventually all qualifying individuals based on income.
If you live in Burnaby, BC, and meet the eligibility criteria, you can visit a CDCP dentist who is registered under this plan to receive partial or full coverage for your treatments, depending on your household income level.
Read more: 4 Tooth Decay Treatments That Do Not Include Extraction
To qualify for the Canadian Dental Care Plan, you must:
If your household income is below $70,000, you may receive full coverage. Those with incomes between $70,000 and $90,000 may receive partial coverage, depending on the services provided.
Choosing a CDCP dentist gives you access to professional, affordable, and preventive dental care without financial strain. Here are the top benefits of doing so:
The main advantage of the CDCP is affordability. Many people in Burnaby avoid dental visits because of cost concerns — even for basic checkups. With the CDCP, you can now receive preventive care such as cleanings, fluoride treatments, and oral exams at reduced or no cost.
Regular visits to your dentist can help catch issues like cavities and gum disease early, preventing more serious and costly treatments down the road.
A CDCP dentist provides a wide range of essential services under the plan. Coverage typically includes:
This makes it easier for you and your family to maintain healthy smiles, even if you’re on a limited budget.
Also read: How Much Is Teeth Cleaning Without Insurance?
Prevention is always better than cure and the CDCP program emphasizes preventive dental care. Regular dental checkups can help your dentist identify issues like plaque buildup, gum inflammation, or small cavities before they worsen.
Visiting a CDCP dentist in Burnaby also helps you stay on track with your oral hygiene goals, lowering your risk of gum disease, tooth decay, and other dental problems.
CDCP dentists in Burnaby are licensed professionals who meet all the standards set by the College of Dental Surgeons of British Columbia (CDSBC). They’re fully qualified to provide high-quality treatments while helping you understand how your CDCP benefits work.
These professionals take the time to explain your treatment options, ensuring you make informed decisions about your oral health without feeling pressured or confused.
Your oral health has a direct link to your overall health. Untreated dental problems can lead to infections, pain, and even systemic conditions such as heart disease and diabetes.
By using your CDCP benefits to see a dentist regularly, you protect not just your smile but also your overall well-being. Good oral hygiene and timely dental care can also boost your confidence, allowing you to speak, smile, and eat comfortably.
Getting started with a CDCP dentist in Burnaby, BC is simple. Here’s how the process generally works:
While the CDCP provides significant support, not every dental service may be fully covered. Treatments such as cosmetic dentistry (e.g., teeth whitening or veneers), orthodontic procedures, and certain advanced restorative services may not be included.
It’s always best to consult your CDCP dentist before beginning treatment to understand what is and isn’t covered under the plan.
Even with the CDCP’s benefits, maintaining your oral hygiene routine at home is essential. Here are a few simple tips:
Good habits, combined with professional dental care, ensure long-term oral health and fewer dental emergencies.
The Canadian Dental Care Plan is a game-changer for Canadians seeking affordable dental care. By visiting a CDCP dentist in Burnaby, BC, you can access quality treatment without worrying about the financial burden. From preventive cleanings to essential restorative procedures, this program empowers individuals and families to prioritize their oral health.
Your smile deserves consistent care and financial limitations shouldn’t stand in the way of that.
Visit our clinic to get trusted dental services and experience personalized care that fits your needs and budget.
Monday, November 10th, 2025

Maintaining a healthy, confident smile requires more than just brushing and flossing at home. Regular professional cleanings play a significant role in keeping your teeth and gums in top condition. But one of the most common questions asked is: “How often should you get your teeth cleaned?” The answer isn’t the same for everyone — it depends on your oral health, dental history, and lifestyle. Let’s explore why professional cleanings matter, how often you should schedule them, and what to expect during your visit.
Even with the best home care, some plaque and hardened plaque (tartar) can build up on your teeth over time. This buildup can lead to gum disease, cavities, and bad breath if not removed professionally. A routine dental cleaning removes these deposits, helping you maintain healthy teeth and gums.
During your cleaning appointment, your dental hygienist also checks for signs of gum inflammation, tooth decay, and other early indicators of oral health problems. Catching issues early means less discomfort, simpler treatments, and lower long-term costs.
In short, getting your teeth cleaned regularly is an essential part of preventive dental care, not just a cosmetic step for a brighter smile.
Most dentists in Coquitlam, recommend a professional cleaning every six months — that’s twice a year. This general guideline works well for most adults and children with healthy gums, no major dental issues, and good oral hygiene habits at home.
However, some people may need more frequent cleanings. Here’s how to determine what’s best for you.
If your dentist recommends more frequent visits, it’s usually because you have one or more risk factors for oral health issues. You might need a cleaning every 3 to 4 months if you:
So, while the average person should visit the dentist twice a year, others may benefit from more frequent visits to maintain their oral health.
If you’re wondering how often to get teeth cleaning based on your individual needs, it’s best to discuss it with your dentist. They’ll tailor a cleaning schedule to your oral health and lifestyle.
You’ve probably heard your dentist recommend a cleaning every six months — but why that specific timeframe?
Plaque forms on your teeth every day, and if not removed, it hardens into tartar within 24 to 72 hours. Tartar cannot be removed with brushing or flossing; it requires professional dental tools. Left unchecked, it irritates your gums and can lead to gum disease.
By scheduling cleanings every six months, you ensure that plaque and tartar are removed before they cause significant problems. This frequency also allows your dentist to detect early signs of issues like cavities, tooth decay, or oral cancer — when treatment is most effective and least invasive.
Also Read: How Much Is Teeth Cleaning Without Insurance?
Understanding what happens during a professional cleaning can make your visits more comfortable and predictable.
A typical dental cleaning appointment includes the following steps:
The entire process usually takes 30 to 60 minutes, depending on your oral health and the amount of buildup to be removed.
You might think missing one cleaning isn’t a big deal, but skipping dental appointments can have lasting effects on your oral health.
Here’s what can happen if you don’t get regular cleanings:
In short, regular cleanings are an investment in your oral health that saves you time, pain, and money in the long run.
Must read: 4 Tooth Decay Treatments That Do Not Include Extraction
Even if your last cleaning was recent, you might need another visit if you notice any of the following:
These are warning signs of early gum disease or buildup, and prompt professional care can prevent more serious dental issues.
While professional cleanings are essential, your daily habits matter just as much. Here’s how to keep your teeth clean and healthy between appointments:
Following these steps will help you maintain your oral health and reduce the risk of plaque buildup between cleanings.
In Canada, dental professionals generally recommend cleanings every six months, though some insurance plans cover one cleaning per year. However, for individuals with gum disease, diabetes, or other risk factors, more frequent cleanings (every 3–4 months) are often advised.
If you’re unsure how often you should get a teeth cleaning, talk to your dentist. They’ll assess your oral health, habits, and history to create a customized schedule that keeps your smile healthy and bright.
So, how often should you get your teeth cleaned? For most people, the answer is twice a year, but your dentist may suggest more frequent visits depending on your oral health. Regular cleanings not only keep your smile bright but also prevent serious dental issues before they start. Your oral health is an essential part of your overall well-being, and professional dental cleanings are a simple, effective way to protect it. Schedule your next dental cleaning and take one step closer to a healthier, more confident smile.
Tuesday, October 21st, 2025

Tooth pain can strike at the most inconvenient times, and for many people living in Canada, it can be stressful trying to find relief quickly. While visiting a dentist is always the safest solution, there are natural and free home remedies that can help ease discomfort until you can get professional care. In this blog, we will explore several effective solutions, including treatments for toothache pain, quick relief methods, and strategies to manage nighttime toothaches.
Tooth pain can occur for several reasons, including cavities, cracked teeth, gum infection, or sensitivity. A “hole in tooth,” or dental cavity, is a common cause of sharp, persistent pain. While home remedies cannot address the underlying issue, they can help reduce inflammation, alleviate discomfort, and provide temporary symptom relief.
When you have a hole in your tooth, the nerve endings inside the tooth are often exposed, which causes pain when eating, drinking, or even breathing cold air. Here are some natural remedies you can try at home:
Managing pain from a cavity involves more than just numbing the area temporarily. You can combine remedies for better relief:
For sudden toothaches, you need quick and effective home remedies that can ease pain fast:
Tooth pain often worsens at night due to changes in blood flow when lying down. Here are ways to manage nighttime discomfort:
While home remedies provide temporary relief, it’s essential to take preventive measures to avoid future tooth pain:
Home remedies can help manage discomfort, but they are not a substitute for professional dental care. If you have a persistent hole in your tooth, swelling, fever, or severe pain, it’s crucial to see a dentist as soon as possible. Delaying treatment can lead to further infection or even tooth loss.
Natural, free home remedies for tooth pain are effective ways to manage discomfort and get temporary relief. Saltwater rinses, clove oil, cold compresses, and herbal remedies such as guava leaves or peppermint can all help alleviate pain. For sudden or nighttime toothaches, these strategies can help you rest and feel more comfortable until professional treatment is available. If you are struggling with tooth pain, don’t wait until it worsens. Book your appointment with us today and take the first step toward a pain-free and confident smile. Our experienced dental team is here to guide you and provide long-lasting solutions for your dental health.
Wednesday, October 15th, 2025
If you are living in Canada and facing dental issues that could require a root canal, it’s natural to have questions about what to expect before, during, and after the procedure. Root canals are a standard treatment designed to save teeth that are severely decayed or infected. While the idea may sound intimidating, understanding the process can help you feel more prepared and confident. This blog will guide you through the entire experience, including the procedure, recovery, and long-term outcomes.
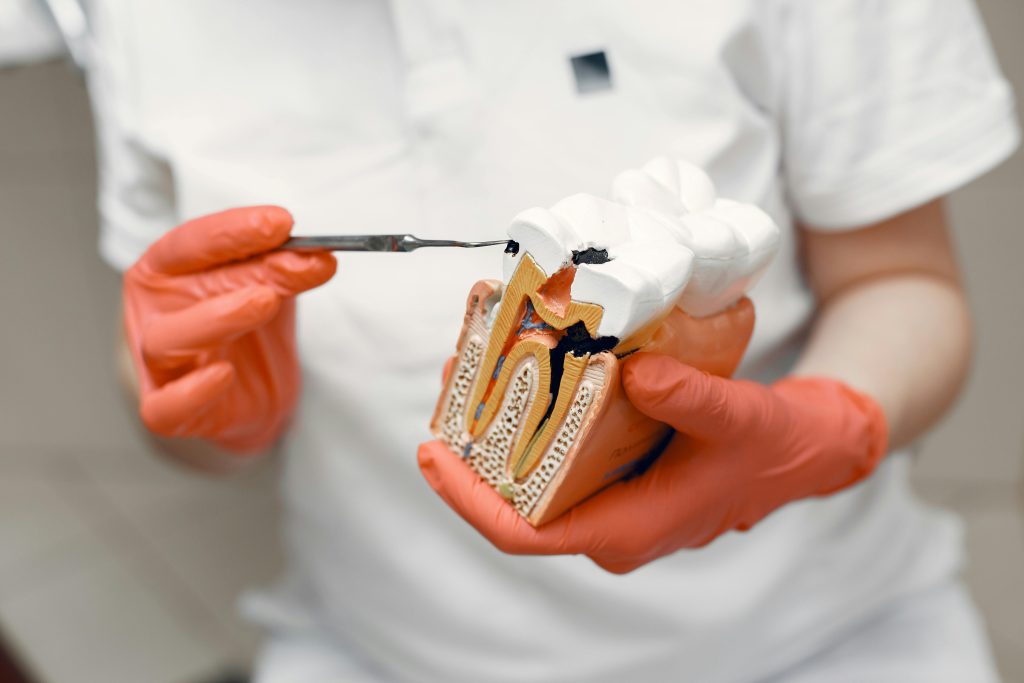
A root canal is a dental procedure that removes infected or damaged pulp from inside a tooth. The pulp contains nerves and blood vessels, and when it becomes infected, it can cause severe pain, swelling, and even lead to the formation of abscesses. Root canal therapy helps eliminate the infection, protect the tooth from further damage, and relieve discomfort.
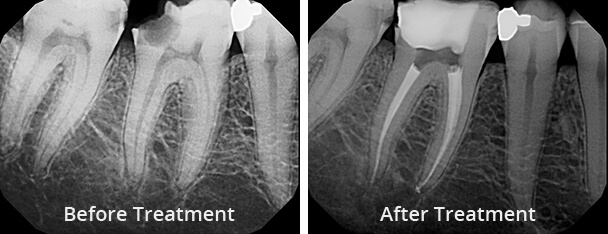
Before your root canal, your dentist will assess your dental health and take X-rays to determine the extent of the infection. It’s common to experience some anxiety about the procedure, but modern dentistry has made root canals much more comfortable than in the past. Your dentist may discuss options for sedation or local anesthesia to ensure a pain-free experience.
It’s essential to avoid consuming anything heavy before the procedure if sedation is planned, and be sure to inform your dentist about any medications or medical conditions you may have. Preparing mentally and physically can make the entire process smoother and reduce post-treatment discomfort.
Understanding the step-by-step procedure can help reduce anxiety and give you a clear idea of what to expect:
After a root canal, it is common to experience some mild discomfort or sensitivity for a few days. Over-the-counter pain relievers recommended by your dentist usually manage this effectively. Maintaining good oral hygiene, including brushing and flossing, is essential to prevent further infection.
Avoid chewing hard foods on the treated tooth until it is fully restored with a permanent filling or crown. Soft foods and a gentle oral care routine can help your tooth heal properly.
Many people wonder if they can resume physical activity after a root canal. Light activities, such as walking or gentle stretching, are generally safe on the same day, but it’s recommended to avoid strenuous exercise for at least 24 hours. Intense workouts can increase blood flow and potentially worsen swelling or discomfort in the treated area. Always follow your dentist’s instructions and listen to your body during the recovery process.
With proper care, a root canal-treated tooth with a crown can last for many years, often 10 to 15 years or even longer. The crown protects the tooth from fractures and further decay, ensuring its longevity. Regular dental check-ups, good oral hygiene, and avoiding habits like chewing ice or hard candies can help maintain the strength and function of the restored tooth.
After a successful root canal treatment, many patients experience a significant reduction in pain and sensitivity. The treated tooth is preserved, allowing you to maintain your natural smile and bite function. While the initial procedure may cause temporary discomfort, the long-term benefits of a healthy, infection-free tooth outweigh the short-term inconvenience.
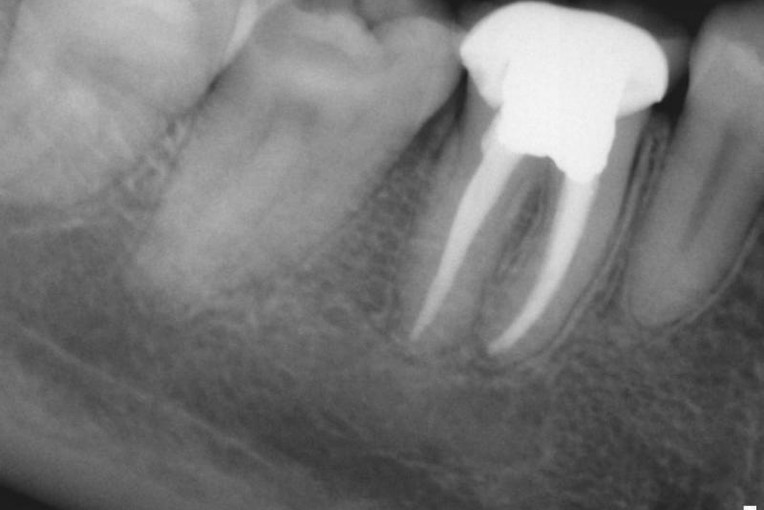
Before the procedure, you may experience pain, swelling, or sensitivity in the affected tooth. After the treatment, these symptoms usually subside within a few days, leaving you with a stronger and healthier tooth. Crowns or permanent fillings help restore both the appearance and function of your teeth, giving you confidence in your smile.
Root canal recovery varies from person to person, but following these tips can make the process quicker and more comfortable.
Understanding what to expect before and after a root canal can make the experience much less stressful. The procedure is safe, effective, and essential for saving teeth that might otherwise require extraction. With proper care and a protective crown, your restored tooth can function normally for many years, allowing you to enjoy a healthy smile.
If you are in Canada and need a root canal or would like to learn more about your options, our experienced dental team is here to guide you through every step. Book your appointment with us today and take the first step towards a healthy and confident smile.
Wednesday, September 10th, 2025
Professional dental cleanings are an essential part of maintaining a healthy smile. Even with good brushing and flossing habits, plaque and tartar can still accumulate on your teeth, potentially leading to gum disease and cavities if left untreated. But if you don’t have dental insurance, you may be asking: How much does teeth cleaning cost without coverage? The answer depends on the type of cleaning you need, your location, and whether additional services, such as X-rays, are included. In this blog, we’ll explore the average costs of teeth cleaning in Canada without insurance, why regular cleanings matter, and affordable options available for Canadians.
The cost of a routine dental cleaning varies from province to province, but Canadians can expect the following price ranges:
These estimates are based on provincial fee guides issued by dental associations in provinces like Ontario, Alberta, and British Columbia. However, each dental clinic sets its own fees so that costs may be slightly higher or lower depending on your city.
When you pay out of pocket for teeth cleaning in Canada, you’re typically paying for more than just polishing. A cleaning appointment often includes:
Depending on your needs, these add-ons can increase the overall bill, but they play a vital role in preventing costly dental problems later.
If you don’t have insurance, skipping dental cleanings to save money can be tempting. But in Canada, untreated oral health issues can quickly become expensive. Here’s why cleanings are worth the investment:
Think of dental cleaning as preventive care that saves money in the long run.
If you’re paying out of pocket, there are still affordable options across Canada:
Several elements determine how much you’ll pay:
So, how much is teeth cleaning without insurance in Canada? On average, expect to pay between $100 and $250 for a standard cleaning, and up to $400 if X-rays and exams are included. Deep cleanings for gum disease are significantly more expensive but essential for long-term oral health.
Even without insurance, regular professional cleanings are a wise investment. They prevent serious dental problems, protect overall health, and save money on future treatments. For Canadians without coverage, options such as dental schools, community clinics, and preventive care can help keep costs manageable while ensuring your smile stays healthy.
Monday, September 8th, 2025